
So, you’ve got your hands on Cartographers and you’re ready to start sketching your way to victory. But wait – how exactly do you ensure you’re the master cartographer at the table? Whether you’re a seasoned player or just charting your first map, a few strategic tips can make all the difference. I’ve analyzed the statistics of top players and used my own strategies in dozens of games to work up to a respectable top 50 ranking on BGA. Let’s dive into some strategies and tactics to help you dominate your next game of Cartographers!
Collect coins early for maximum value
Coins are probably the most reliable and powerful scoring mechanism in Cartographers, with the potential to score multiple points per coin. Coins are most valuable when you acquire them in the first season because they will score 4 points (1 point for every season), while coins acquired in Winter are only worth 1 point.
Getting coins in the first two rounds should be a central focus in every game of Cartographers you play. To emphasize how important they are, let’s take a look at the stats from BGA‘s top players when compared to the average player:
| Statistic | Top Player #1 | Top Player #2 | Top Player #3 | Average Player |
|---|---|---|---|---|
| Spring Coins Score | 2.24 | 1.74 | 2.09 | 1.62 |
| Summer Coins Score | 4.58 | 3.88 | 4.39 | 3.46 |
| Fall Coins Score | 6.84 | 5.83 | 6.34 | 5.41 |
| Winter Coins Score | 8.63 | 7.96 | 8.16 | 7.42 |
Clearly, the best players tend to place a lot more emphasis on coins than the average players does – especially in Spring and Summer when the coins are more valuable. Take a lesson from these statistics and strive to emulate them!
The easiest way to get coins early is to always select a shape option that comes with a coin, if possible. Any value that you might get for taking the larger shape instead is almost assuredly not worth it, especially in the first two seasons. Surrounding a mountain or two as quickly as possible is also generally a good idea, especially if it fits in to the overall strategy for your map (more on that later).
As valuable as early coins are, they aren’t always the most economical choice. Do the math with all of the options (don’t forget to factor in how many rounds each scoring mechanism will score on) and see if the coin makes sense. If multiple options look like they’ll score the same, make a determination based on the overall size and shape of the piece options. Sometimes it’s better to play with smaller pieces, while other times it’s beneficial to fill up as much space as possible (more on this later).
Surround monsters quickly, especially early on
Monsters are the only direct player interaction in Cartographers and they have the potential to be game-wrecking if not properly dealt with. You’ll lose a point for every empty space adjacent to a monster square in every season, so it’s imperative that you surround your monsters as quickly as possible.
Just like coins, this is especially true in the Spring and Summer since each empty adjacent space has the potential to score -4 or -3 points, respectively. This can really add up in a hurry, so surrounding monsters should usually be a top priority. To demonstrate how important this is, let’s again look at how top players deal with monsters:
| Top Player #1 | Top Player #2 | Top Player #3 | Average Player | |
|---|---|---|---|---|
| Spring Monster Score | -1.94 | -2.19 | -1.47 | -2.03 |
| Summer Monster Score | -3.74 | -3.55 | -4.23 | -4.43 |
| Fall Monster Score | -5.39 | -5.62 | -4.97 | -5.66 |
| Winter Monster Score | -4.72 | -5.07 | -5.41 | -5.42 |
These players have win rates hovering around 90%, so you would do well to emulate their play as closely as possible. They clearly place more emphasis on surrounding monsters than the average player.
Place Monsters in problematic areas
Of course, we also get to place monsters on our opponents’ maps to make their lives more difficult. Some factors to consider when placing your Monsters include:
- How crowded the board is
- Where your opponent is trying to play
- If Ruins spaces are open
- Proximity to other Monsters
In general, it is best to place Monsters far away from your opponent’s other filled-in spaces where he’ll have to go out of his way to surround them. However, especially in the middle and late game, you can also look for opportunities to cut your opponent off from doing things like expanding a city or reaching a mounting square for Stoneside Forest.
It’s also usually a good idea to fill a Ruins space, if possible. This limits your opponent’s options when a Ruins card is played and reduces their scoring potential for edicts like The Golden Granary.
When placing a second or third round of Monsters, try to space them away from other Monsters to make it more difficult and time-consuming to surround them. If you place the new Monsters 1 square away from each other then you don’t get any added value from that square.
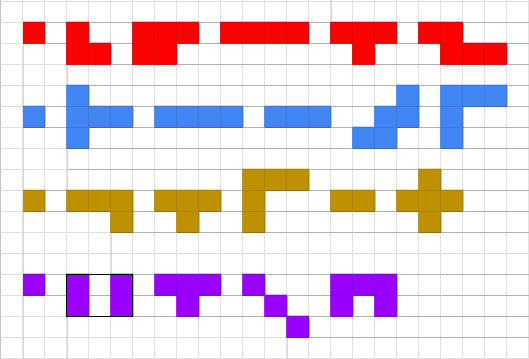
Memorize the possible shapes in each terrain type
It’s impossible to know what shapes will be turned up on the cards in each season, but knowing the options is critical to success. If you know the possibilities then you can make plans for future placements and ensure you don’t leave yourself hoping for a shape that will never come. For ease of reference, I have put together this diagram for you:
Have a vision of your ideal board and build it
When you start a game of Cartographers the first thing you should do is look at the four edicts and form a clear picture in your mind of what a winning board will look like. This will vary widely based on the combination of edicts, but you should be able to get a sense of how your board should be constructed to score the most points.
Every time you fill squares, consider how it fits into your overall vision of the board. Make sure you aren’t sacrificing future scoring options for a short-term ‘win’. Keep the possible shapes in mind when making your choices and don’t be afraid to wait for the perfect piece – you’ll be surprised at how often it turns up and scores big points.
DID YOU KNOW? There are many exciting Cartographers expansions available on Amazon that bring a fresh feel to the game including:
Use the general map edict as a building guide
On a related note, I like to use the general map edict as the basis for most of my planning. With the exception of The Cauldrons, these edicts give you a really good idea of how your should construct your map.
- Borderlands: Focus on expanding one or two rows/columns at a time
- Broken Road: Play in the bottom left corner as much as possible, leaving no gaps
- Lost Barony: Start in the middle of the board and build out, leaving no gaps
The rest of your plan will involve how you fit the different colors into the skeletal structure defined by these edicts. Sometimes they will conflict (like Lost Barony and Sentinel Wood) so you’ll have to make a judgment call about how to handle those situations, but often times you’ll be able to find some synergy between all of your edicts.
Know which Ambush cards are possibly in the deck
There are only 4 Ambush cards in the game, each with a unique shape. You can sometimes use this to your advantage late in the game by placing your shapes in such a way as to block any remaining Ambush cards from being played on your board.
For example, if your board is almost filled up and you have a choice between two shapes that otherwise won’t score you any points, you can choose one and arrange it so that the remaining Ambush cards can’t fit anywhere on your board. This prevents your opponents from placing the Monsters and saves you from the negative points that come with them.
Play for all future edicts in every season
Most inexperienced Cartographers players tend to try to score primarily with the two edicts in the current season, but this is a grave error. To maximize your scoring potential, you have to factor in the scoring for the current and future edicts and then determine how to milk the most points out of each.
For example, let’s say it’s Summer. You have a shape that will score you 3 points for Edict B, but there is also a shape that will score you 2 points for Edict D. The 2 points for Edict D is likely the better choice here because Edict D will be scored twice (in Fall and Winter) for a total of 4 points while Edict B is only going to be scored once for 3 points.
Let’s again look at the scoring from top players to see how important this principle is:
| Top Player #1 | Top Player #2 | Top Player #3 | Average Player | |
|---|---|---|---|---|
| Spring Edict A Score | 5.52 | 5.16 | 6.2 | 5.58 |
| Spring Edict B Score | 5.74 | 5.61 | 6.72 | 5.38 |
| Summer Edict B Score | 9.19 | 8.75 | 11.7 | 10.23 |
| Summer Edict C Score | 10.93 | 11.71 | 11.5 | 8.93 |
| Fall Edict C Score | 14.9 | 15.44 | 15.94 | 13.16 |
| Fall Edict D Score | 16.01 | 15.47 | 15.17 | 12.32 |
| Winter Edict D Score | 19.97 | 19.06 | 19.5 | 16.24 |
| Winter Edict A Score | 17.67 | 17.7 | 18.74 | 16.22 |
We can clearly see that in the Edict scores of top players in Spring and Summer are very similar to those of average players. However, there is a large separation in the Fall and an even larger difference in the Winter. This is because the top players are always thinking ahead and playing for all future edict scores, not just the current season.
One oddity that I noticed when compiling this data is the Summer Edict B score. Most top players have a slightly lower score here than the average player, and I think it’s because that particular edict slot has the lowest scoring potential. You only have two seasons (Spring and Summer) to make any progress on it, so it’s hard to score big with it. Therefore, the top players probably de-emphasize this Edict overall and choose to focus on the other three since they’re easier to scale. Which brings me to my next point…
Focus on edicts that are easy to scale
Some Edicts are simply easier to score with than others, and therefore deserve more of your attention and effort. It helps to think about their scoring potential in terms of the amount of points you can score per turn or per shape. Some Edicts are easy to score a decent amount of points with at first but lack scaling potential, while others don’t score very well early on but have the ability to grow significantly later on. Here are my thoughts on every Edict so that you can get a sense of which to focus on and when.
| Edict | Early Scoring | Scaling Potential | Comments |
|---|---|---|---|
| Sentinel Wood | Medium | Medium | Solid overall, nothing special |
| Treetower | Difficult | High | Can score huge points late |
| Greenbough | Medium | Medium | Always scores decently |
| Stoneside Forest | Difficult | Low | Hard cap on points, difficult to complete early |
| Canal Lake | Easy | Medium | Dependent on board setup |
| Golden Granary | Medium | Medium | Always put a farm on every ruin possible |
| Mages Valley | Medium | Low | Clumsy and low reward overall |
| Shoreside Expanse | Easy | Medium | Easy to score well, but board will get busy |
| Wildholds | Easy | Medium | Good return on investment, easy to do |
| Greengold Plains | Difficult | Low | Hard to manage, requires some luck |
| Great City | Low | High | Requires planning, leave space to grow |
| Shieldgate | Low | High | Keep cities roughly equal, leave room to grow |
| Borderlands | Low | High | Can score huge in Fall and Winter |
| Broken Road | Medium | Medium | Scores well early, becomes hard to expand |
| Lost Barony | Medium | Medium | Scores well early, becomes hard to expand |
| The Cauldrons | Low | Low | Usually ignore, score what you can |
Consider covering ruins early for more 1×1 squares
In most games of Cartographers, you’ll want to leave most of your ruins squares open for when you’re required to play on one. However, there are some cases where it can be advantageous to have all of your ruins squares covered.
The benefit of having no available ruins squares is that you get a 1×1 square in the color of your choosing. That’s a big deal! For example, you can use that tile to finish off a Lose Barony square, merge large cities into one for Great City, or complete a leg of Stoneside Forest. If you do this early enough in the game you’ll get multiple chances at these types of opportunities.
You might also want to consider covering all of your ruins tiles with farmland if you have Golden Barony. Those 3 points per ruins space really add up, and you don’t want your opponent to steal those opportunities from you with an ambush.
That being said, in most cases you’re better off having at least one or two ruins spaces to choose from. I wouldn’t recommend going this route unless you have a very clear plan in your head and you’re confident that you can make it work.
Don’t worry about making a ‘pretty’ map
Many inexperienced players start off by trying to create a ‘pretty’ map with very few gaps and all of their filled spaces in one area. While this is sometimes a good idea, it’s usually not the best path to victory. In general, you should place your pieces where they will score the most points instead of what is aesthetically pleasing.
It can be disconcerting to place pieces all over the map in strange orientations with seemingly no cohesiveness, but as long as you’re sticking to your plan you shouldn’t worry about these things. By the end of the game most maps look pretty disheveled no matter how hard you try to prevent it, so you may as well score as many points as possible along the way. In fact, having a haphazard-looking map often works even more to your advantage because your opponents have limited options when placing Monsters.
Thanks for reading! Did I miss anything or do you have some ideas of your own? Please leave a comment below.
Leave a Reply