
Azul is a beautiful, strategy-heavy game that somehow manages to be relaxing and anxiety-inducing at the same time. I’ve been playing and improving at Azul for a while now, and along the way I have picked up a lot of strategy tips that have allowed me to move up in the online rankings. These Azul strategy tips will improve your game and help you to win more often.
In general, the best Azul strategies are to start in the center of the board and build outward, focus on filling the top 3 rows in every round, and prioritize being the first player. You should also avoid having partially filled 4th and 5th rows and deny your opponents important tiles that they need.
Every game of Azul plays out differently, which is part of what makes it so fun. The strategy tips listed below will improve your game tremendously if properly implemented, but it can be hard to know how to balance all of the different priorities that arise during a game. I’ll dive into the ‘why’ and ‘how’ of these strategy tips with some examples to help you implement them in your own games.
Focus on one center column at a time
Almost every Azul player knows that, in general, focusing on the center columns is ideal. This allows you to build out from the center in every direction while scoring more Adjacency Points and gives you more flexibility with your tile choices.
Taking this one step further, I find that it’s best to focus your efforts on one of the three central columns. Which one you pick will depend on the tiles available and how your opponent plays, but having a plan from the start is very powerful.
This is especially important when considering the 4th and 5th rows. I’ll talk about this more later on, but you want to be very strategic about how you fill in your 4th and 5th rows. Only place tiles in those rows that will help you to finish completing your chosen central column, otherwise you’ll lose valuable time and tiles.
Try to fill the top 3 rows in every round
The vast majority of the points scored in Azul usually come from placing tiles and scoring Adjacency Points. This is especially true in high-level play between top players. In general, elite players focus on efficiently placing tiles in the top 3 rows on every round which helps to maximize their overall score.
Every tile on the Wall is worth 1 point, regardless of how many tiles it takes to fill it. The top 3 rows are much easier to fill than the bottom 2, so it’s important to prioritize filling those rows in a strategic way on every turn. The more tiles you place there the more opportunities there will be for Adjacency Points, especially if you plan ahead with your tile placement.
Play diagonally at the beginning of the game
A common strategy at the beginning of the game is to try to fill the top three rows in a single column (usually a central column). This is generally a good plan, but it actually isn’t necessarily ideal.
Instead of filling in one column in the first round, try to play diagonally across the three central columns. This will eventually lead to slightly more points if you manage to properly fill in the gaps in subsequent rounds. The reason for this is simple math and geometry!
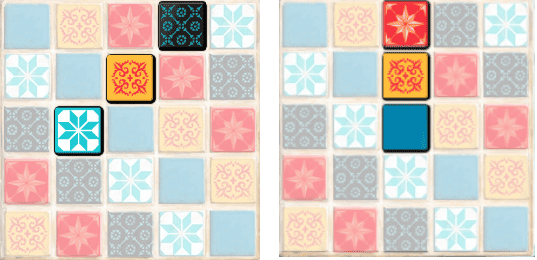
In the example above, the left side has scored 3 points and the right has scored 6. However, this is only the beginning of the story. In the next round, the left side can fill in (from the top down) their red, blue, and blue squares to score another 13 points, while the right side would optimally fill the top three tiles of an adjacent column to score another 11 points.
This leaves the left side just 1 point behind, but it gets even better in the next round where the left side could complete the 3×3 square to score 17 points while the right side scores just 14 points. This means that, with optimal tile placement, playing diagonally in the first round scores more points than playing vertically.
You can see this concept demonstrated on this really nice YouTube video:
The takeaway here is not necessarily that you should always try to play diagonally in the first round, but rather that you can be more flexible on your first round and still come out even or even ahead.
Avoid having partially filled 4th and 5th rows
As a game of Azul progresses it’s fairly common to get to the last couple of turns in a round and see that there is a large accumulation of tiles in a single color. These groups of 4, 5, or even more tiles can be a blessing or a curse depending on how well you’ve managed your board. It’s important to have at least one of the bottom two rows open at the beginning of every round.
In general, you should do everything you can to avoid having partially filled 4th and 5th rows when entering a new round. If one of them is partially filled that’s okay, but it can be particularly disastrous if both of them are partially filled.
DID YOU KNOW? If you like Azul, you’ll also enjoy the many expansions that bring a new look and feel to the classic game. You can check out here on Amazon.
The reason is because if you get to the end of the round and you have to take a lot of tiles you need someplace to put them other than on the Floor. This way, you can use all of those tiles to your advantage by putting them on your open row instead of losing a lot of points by placing them on the Floor.
Be the first player as often as possible
Being the first player in a round of Azul is extremely powerful. Many newer players avoid taking the First Player Token because it means losing 1 point, but it is almost always worth taking because you will get the first pick of the Factory Displays in the next round. This means you can get priority on:
- Tiles that you need but are in short supply
- Large groups of 3 or 4 tiles
- Tiles that your opponents might need

Someone once told me to think about the -1 point for the First Player Token not as a penalty but more as a game balancing mechanic. Going first is such a big advantage that it had to be mitigated in some way, so the game designers settled giving the first player -1 point in each round. In actual fact, this penalty is probably not severe enough.
In games amongst top tier players, the First Player Token is very commonly taken as soon as possible. The current top rated player in the world, MissDong, goes first an astonishing 2.87 rounds per game which is much higher than average. Clearly, she makes it a point to go first and get the first crack at picking tiles.
The exceptions to this rule are when you desperately need tiles that your opponent is likely to take on their next turn, or on the 5th round of the game when there is unlikely to be another round. In these cases, just make the best play possible and ignore the token altogether.
Take from the center instead of from a Display
All else being equal, it is usually best to pick tiles from the center instead of from a Factory Display. This tends to give your opponent less flexibility and results in fewer large groups of tiles at the end of a round. There is a lot of nuance to this decision that can really only be learned from playing a lot, but if you’re not sure whether to draw from the center or from a Display just use this as a rule of thumb.
Track tile counts and plan accordingly
One of the most powerful strategies you can use in Azul is counting tiles. Much like card counting, this gives you a lot of insight about what to expect in subsequent rounds and allows you to plan accordingly. This might sound daunting, but it’s actually not as hard as it might seem.
CHECK IT OUT: If you like Azul for it’s tile-laying mechanics and beautiful artwork, you’ll also love Patchwork (link to Amazon), the popular quilt-themed 2-player game. Of course, I’ve written a Complete Strategy Guide to Patchwork so you can dominate your friends as soon as you get it!
By looking at the boards of all of the players you can easily count how many tiles of each color have been used to create those boards. For example, a blue tile in the middle of a board means 3 blues were used to create it. The only tiles you can’t see are the ones that were played onto a player’s Floor and discarded into the bag.
This means you really only need to count how many tiles of each color have gone onto the Floor. Then you’ll know how many of each color are left and you can build your strategy for the last few rounds. This is especially powerful at the beginning of round 4 when you can know exactly what’s left in the bag for round 5.
Make row 5 part of your larger game plan
Placing tiles in the 5th row is a big decision. It takes a lot of tiles to complete which usually means dedicating a lot of turns. Most top level players will only complete one 5th row per game, which means they have to make sure it’s the right one.
Don’t start to fill your 5th row just because there are 3 or 4 tiles of one color available. Make sure that that color is one you actually need and want. You should have a column in mind that you’re trying to complete, so make sure that the color you choose for your 5th row helps accomplish that goal.
If you manage to fill your 5th row but that color isn’t adjacent to anything, it’s still only worth 1 point. Those tiles and turns could have been better spent focused on other objectives – namely, filling in your top rows and scoring Adjacency Points.
Discard instead of committing to the 5th row
In that same vein, you have be very protective of your 5th row. New players often end up putting ‘extra’ tiles in their 5th row early in the game to avoid putting them on their floor, but this is a disastrous mistake.
It’s almost always better to place tiles you don’t need on the floor instead of committing them to the 5th row. You don’t want to lock yourself into having to finish out the 5th row in a color you don’t even need. The points you lose by putting ‘extra’ tiles on the Floor are usually inconsequential next to the strategic disadvantage you’ll face by putting them on the 5th row.
Deny your opponents tiles that they need
Azul might look like a fun and relaxing game, but it can get very competitive and cutthroat. This is especially true in two-player games, where denying your opponent points is just as good as scoring points for yourself.
Keep an eye on what tiles your opponents need. In games with 3 or 4 players you can simply scan each player’s board at the beginning of every round to get a sense of what tiles they’ll be looking for. If you see tiles that a player is in desperate need of and they will help your own cause, go ahead and snatch them up.
In a two-player game, you need to be even more ruthless. One every turn you should be looking at your opponent’s board just as much as your own. If they need a the last tile of a color to complete a 4th or 5th row, take it yourself – even if it means putting it on the Floor. Always be doing the math to see if it’s better to deny your opponent of tiles or focus on building toward your own objectives.
Overload your opponent with tiles they can’t use
If you’ve been playing Azul for even a short amount of time you’ve probably experience this: at the end of a round you have to draw a pile of 5 or 6 tiles in a color that you can’t use, forcing you to place them on your floor and lose a ton of points. Advanced players use this mechanic to great effect to screw over their opponents and it’s a skill worth mastering.
Look at your opponents’ board and take note of what colors they don’t have much (or any) room for. Then, try to amass that color into the center and force them to take it at the end of the round. Which brings me to…
Calculate when there is only one display left
You have to be very careful and calculating towards the end of a round. When there is only one Factory Display left and it’s your turn, stop for a minute and play things out in your head. You need to decide if it’s better to take from the middle or the Display by visualizing the results in your mind.
Count how many colors and/or draws will be left in each scenario. In a two-player game, you can often force your opponent into drawing a lot of tiles in a color they can’t use by strategically leaving an odd number of colors in the middle.
Assume that the game will only last 5 rounds
The vast majority of Azul games only last 5 rounds. Most players focus on completing their top rows in every round, so it is very rare that at least one player won’t complete a row by the end of the 5th round. This means that you should always go into a game assuming that you only have 5 rounds to work with.
Tile counting becomes easier with this assumption because you shouldn’t rely on the Floor tiles coming back into play. However, if you get to the end of the 4th round and no player has more than 3 tiles in a row filled in, you know that the game will go to at least a 6th round. This gives you a little more flexibility and you should adjust your plan accordingly. It will likely be worth taking the First Player Token in the 5th round since you’ll get to draw first in the 6th.
Don’t be afraid to take negative points
Stacking too many tiles on your Floor is never ideal, but you shouldn’t be too fearful about taking a few negative points in any given round. Look at the Floor as a resource to be utilized, not a scary no-go zone that will automatically lose you the game.
The Floor is there to give you some flexibility and keep your options open for future rounds. It’s worth it to take a couple negative points if it means you’ll be able to score 5 or 6 points in the next round. Similarly, you can take a couple of tiles your opponent needs even if you don’t need them yourself. For example, you can put them on the floor and lose a couple of points to keep them from completing a column.
If you need convincing, top-rated player MissDong loses an average of 13.74 points per game on the Floor, which is more than 3 points higher than the average player. She clearly doesn’t fear using the Floor to her long-term advantage, and neither should we.
Only go for 5-of-a-kind if you’re already close
Scoring 10 points for having 5-of-a-kind is always nice, but it rarely happens in high-level play. Other players can easily thwart your attempts to complete a color because it doesn’t take many tiles for them to do so.
Completing an entire color on your Wall requires 15 of the 20 tiles of that color. Unless the game goes past 5 rounds (which is rare), acquiring those 15 tiles will be very difficult. Your opponent(s) will want at least 6 tiles of every color to complete their top 3 rows, and they will make it a point to deny you the tiles you need.
You should only try for 5-of-a-kind if the tiles fall just right and you know you’ll be able to do it. Otherwise, it’s best to focus on completing columns and rows that contribute to your overall game strategy.
Only end the game if you know you’ll win
Sometimes you end up in a scenario where you opponent can’t end the game on the 5th round, but you can. In these cases, you should be very careful and do the math before your end the game. If you will definitely win the game by ending it on the 5th round then you should do everything you can to do so.
However, if your opponent will end up with more points you should prolong the game and go into another round, giving you another opportunity to win.